
Kitchen Before and After…
Our house has just celebrated her 30th anniversary. We have lived in it the last 17 years. Now that my daughter has moved out into her condo, we have too much house. So, we work to fix up and remodel each room IN the house as well as working on the house’s exterior. Yes, it’s a shame we live in our homes so long and then spend all our efforts fixing them up for someone else to enjoy. But I keep going, thinking of the lucky young family who might live here next, knowing that I will soon be enjoying my gypsy lifestyle.
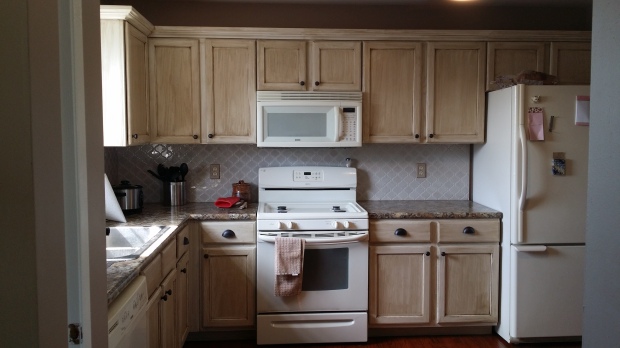
Our first real project was the kitchen remodel. Although I was fond of the dark wood flooring, the dark oak cabinets had become shabby looking and dated. The countertops were a cheap formica, and the sink was way too small. Originally, the house had a pantry with a limited amount of cabinets on one side—not enough space for all our dry goods and housewares. We only had $3,000 to spend remodeling.


Our kitchen before the remodel…
I will admit up front that I’m only about 70% satisfied with this kitchen remodel. In truth, I wasn’t able to do one thing that I really wish we had the money to do—replace all the appliances. Though dated (you can’t really find bisque anywhere but maybe Sears), I didn’t really mind our bisque Kenmore appliances. They’ve lasted far beyond their years and have been very reliable.
I decided that–instead of replacing the appliances–I would decorate the kitchen around the bisque, knowing that eventually the room would need to accommodate the newer style appliances—whether they be stainless, black, or slate. If the new homeowner wanted to splurge or negotiate on newer appliances, we would work that out. But for now, the stove, fridge, microwave, and dishwasher would stay and get a thorough and overdue scrubbing.
 With only $3,000 in the budget, I felt I couldn’t afford to tear out and replace all the kitchen cabinets. About five years ago, we added some unfinished cabinets to the other side of the kitchen. They were in good condition, and I didn’t want to replace them. I know that mismatched cabinets are the trend these days, but I wanted all the cabinets to look like they belonged in the same kitchen, even though they were on opposite walls.
I worked around this by buying new doors with the same profile, dimensions, and hinge style as the newer cabinets. In addition, I felt using the same paint color, cabinet pulls, and countertops on both, might help create the illusion that they were all installed at the same time.

Painting and countertop installation underway…
Using Rustoleum Cabinet Transformations and a LOT of elbow grease, I painted all the existing cabinets and doors to the newer cabinets. I then painted all the new, unfinished oak doors. I did everything in stages, so we were able to use the kitchen as we dragged renovations along. For a few weeks we ate a lot of takeout, and there was a two day period of time where we had taken out and installed the new sink.
I ordered my pulls from www.PullsDirect.com at 5PM on a Friday and, without any special shipping and handling instructions, received them by noon the next day! I would highly recommend them for any cabinet remodels you might need to do. Their prices are fair, service is fast, and their selection of pulls is great! (No–I don’t get paid to advertise for anyone on this site.)
When my daughter redid her kitchen, she found a sink faucet which I absolutely loved. My husband still wanted the dual sink, but we found a much larger new sink with an asymmetrical design. I never realized how inadequate our old sink and faucet were until we installed the new one.
With a $3,000 budget, solid surface and granite countertops were out of the question. But we did choose laminate that looked more like granite countertops in a pattern called Summer Carnival by WilsonArt. I didn’t want the counters with the prefabbed backsplash, because I felt that looked too cheesy, and I knew I was going to tile a backsplash on my own. My husband measured them, ordered them, and picked them up within two weeks. He also installed them, along with putting in the new sink and faucet. After I had painted the new cabinet doors, he installed the new ones with European hinges and put together new drawers for the fronts I had ordered.
I did the DIY tile backsplash. This was only my second tile project, and it took me several days to mortar, lay, grout, and seal the backsplash. The tile was an arabesque pattern (I didn’t want to buy into the Subway tile craze,) which I felt had a homier look. I love how it turned out. I hated doing it, and I would recommend AGAINST doing this for a DIY project. That is because the tiles are virtually impossible to lay perfectly. Because of their non-standard shape, you cannot use standard spacers very well. I will never do that again! This is something good I can say for subway tile: It is cheap and easy to lay.
 Finally, there was the floor. Really, the floor was the only thing worth saving. It was true hardwood, installed when the house was built. It was dirty and worn and needed refinishing. If I hired a professional to refinish, I’m sure it would have cost me at least $500. Too much for my budget! So, I looked for information on how to DIY refinish my own floor and found a YouTube video, produced by This Old House.
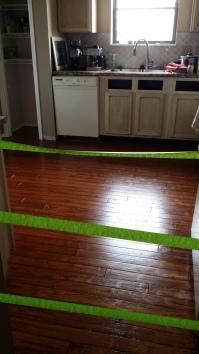 For the floor, there was a LOT of crawling around on my hands and knees, MUCH scrubbing, and profuse sweating. But the floor came out beautifully and sparkled as if it were new. Best of all, we were able to refrain from walking on the drying floor by just leaving the house for two days and going camping.
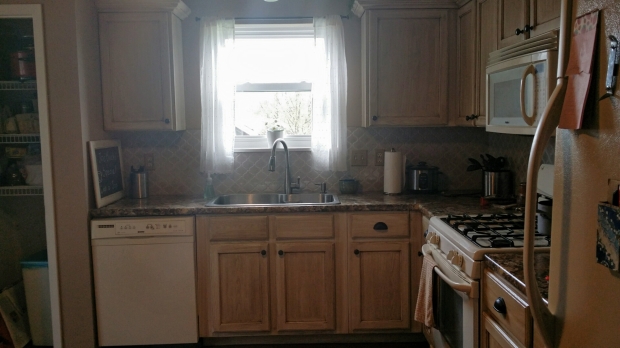
I had selected a paint color from Menard’s called “Ten Gallon Hat,” a color which worked very well with the Rustoleum Linen cabinets and the granite-style countertops. But I felt the room was too dark with the new LED ceiling fan/light we installed. Hubby installed under cabinet lighting which allows us to see what we are doing and illuminates the backsplash beautifully.
 Lastly, we had professionals through Home Depot replace the old bronze aluminum window with white vinyl. It really brightened the room, and now I can actually open the window! That I did not factor into the improvement budget, but it was well worth the cost, and now all the windows in the house match. The kitchen window has been adorned with modified shabby chic curtains…
That’s an in-depth recap on what we’ve been doing in our kitchen. I will feature more specifics about Rustoleum Cabinet Transformations in a later blog.
Thanks for Visiting,
Lois
