Now that Minnie is remodeled, we are focusing on remodeling our house. Why? Because the ultimate goal of this professional gypsy is to sell the house, retire, and head off down the road full-time in our RV. During the next couple of years, all of my projects and most of my time will be devoted to fixing our old abode of 17 years to enable some other lucky family to ultimately enjoy the comforts of this home.
We live in a moderately-priced subdivision in St. Peters, MO. Our home is a Tudor-Style home. I was never a fan of the style. Don’t get me wrong. When we bought it, I was glad to have a “tract house of our own with a fence of real chain link.” What turned me on about this house was that it was very spacious inside and had a huge, fenced backyard for our new dog.
 The original windows were a bronze aluminum. The home had diamonds taped to the window for a leaded muntin effect. But when you got up close on the inside, they looked cheap. When we moved in, I found some adhesive lead, which looked better than the electrical tape the previous owners had up. In 2011, we replaced the window with white vinyl casement windows with the intention of showing off some of my stained-glass art.
With our ultimate goal of fixing the old abode up, I’ve had to focus less on displaying my own personal art and more on showcasing the original style of the home. I decided to decorate and remodel in a sort of English-Tudor Cottage Style. I felt that style would help set this home apart from all the contemporary/transitional style homes, capitalizing on the Tudor-Style exterior, yet further setting this house apart from the other Tudors also available in the subdivision.
Muntins and Mullions and Grids—Oh My!
I decided it was time to put the diamonds back in the windows. I started with some research of photos of Tudor-Style homes with white windows. I found a picture of a quaint home with white muntins (or grids.) I actually fell in love with the look, and I wanted them in MY house. They were dramatic, yet romantic and in keeping with the Tudor Style.
Next, I googled “DIY window grids.” Here’s where I came up with this site, which was written by a DIYer who made his/her own rectangular grids. http://www.therozyhome.com/blog/making-your-own-window-grids-grilles-mullions. Aside from some annoying ads which popped up, this blog was very useful. The writer’s windows looked marvelous in the after photo, seemed simple enough to do, and used relatively inexpensive supplies to get the job done. Only problem—these were rectangular muntins, and I wanted diamonds.
So, I dug back into the far recesses of my brain to tap my geometry skills, bought some supplies, and employed a little trial and error. (Fortunately for you, this blog entry edits out all the failed attempts and focuses on the right way to do things.)
If you want to do a diamond muntins (yes, that’s what they’re called,) these instructions will only work in casement or picture windows. The moulding I used here is too thick for a single or double-hung window frame.
You will need the following supplies:
- Screen trim moulding made of polystyrene (approximately 6 for every window, depending on size)
- White plastic paint
- Hot glue gun
- Large newsprint or blank paper on which to draw a pattern
- Double-sided adhesive mounting tape
Most importantly, you will need some degree of artistic/carpentry aptitude, lots of patience, and a good compound miter saw. No, a miter box WILL NOT do. The angles needed for a diamond pattern are too complex and non-standard. Although it only cost me about $125 in supplies, that cost does not include the saw, and this project took me three full days to complete.

Casement Windows Before
HERE’S HOW TO DO IT:
MEASURE THE WINDOW AND DETERMINE YOUR GRID SIZE.
You will have an outside frame of 45 degree angles. Once the frame is in place, you will have an interior space you fill with your diamond grid. For the typical window, there are fewer diamonds going across the grid than down, because the window is usually taller than it is wide, even though the diamonds are also taller. My window measured 3 x 4—three diamonds going across, four down. The top and bottom diamonds are split in half.
PAINT THE TRIM
First, paint the backs only of the screen trim moulding with plastic paint. The front of the trim is already white, but the backs are a natural tone. You want to be able to see them from the street. Apply two coats in a well-ventilated area. Both items can be purchased at Lowe’s.
Trim:
Paint:
CUT THE FRAME TO FIT YOUR WINDOW OPENING.
The frame should fit neatly in the window opening without any buckling or gaps on the edges. Corners are cut at 45 degrees. Here’s where experience with a miter saw helps, because it gets a LOT hairier than this!
HOT GLUE THE FRAME TOGETHER AND TEST FIT IT INTO YOUR WINDOW OPENING.
You need to make darn sure that your frame fits the window before you start adding grids. You’ll be thankful that you did.
MEASURE THE WORKING OPENING OF THE FRAME AND MAKE A PATTERN.
 Cut a paper template to fit the OUTSIDE of your frame and trace the edges of the INSIDE opening.
FOLD THE PATTERN TO MAKE THE RIGHT NUMBER OF INTERSECT LINES
Folding is easier, but if you’re willing to do a little math, you can calculate. You will need intersect lines for the number of diamonds minus one. So, for me with a 3×4, I needed two vertical lines and three horizontal lines. When calculating, remember to keep in mind that you are using the area INSIDE the frame, so your diamonds won’t be askew.
WITH A DIFFERENT COLOR PEN, DRAW YOUR DIAMOND LINES THROUGH YOUR INTERSECT LINES.
If you did your math right, everything should line up. These are the center lines over which your moulding should line up.
Here’s a guideline of what your pattern should look like:

TAPE YOUR OUTSIDE FRAME TO THE PATTERN AND BEGIN WORKING.
 I started with diagonal lines going in one direction first. You do not have to worry about structural soundness of the grid, since this is just Styrofoam and very lightweight. It just has to look nice. Lay each strip of moulding with its center along the grid lines. Mark off the corner and side angles with removable pen. Here’s where you will get to know your miter saw. I suppose, if you wanted to measure and calculate angles, you could. But trying to figure this out made me a bit crazy, so I just eyeballed it, matching the drawn angle to the blade of the saw.
GLUE EACH DIAGONAL PIECE TO THE FRAME AS YOU GO.
This will give you added stability before you tackle the crossbars.
MEASURE AND CUT EACH CROSSBAR INDIVIDUALLY AND FIT IT IN PLACE.
DO NOT glue all the crossbars until you get a proper fit of each piece. Because this is polystyrene, there is a little give between the diagonal bars, and you will have more consistency if you wait until all the bars are done before you glue them down. I finally figured that I was cutting all the crossbars at a 19 degree angle on the miter saw (but that may vary for you, depending on the size of your window and diamonds.)
CLEAN THE GRID AND FIT IT BACK INTO THE WINDOW OPENING.
This is your last chance to make sure everything fits properly and to sand down anything that needs sanding or adjusting. Also make sure your window glass is completely clean and free of fingerprints.
MOUNT THE GRID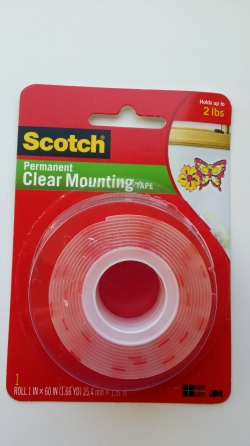
Cut double-sided tape and place it on strategic points (including the corners) of the grid. Remove the red side of the tape and gently fix in place on the window. I shouldn’t have to say this, but you wouldn’t want to break your window glass by pushing too hard to fix the grid in place.

A view of the windows at night.
ENJOY YOUR NEW VIEW
I don’t have much to look at—just the neighborhood cul-de-sac. But I find that I am enjoying drinking my morning coffee and staring out the window. It just seems—oh, I don’t know—more cozy to me. Who knows? Maybe I’ll be so attached to the view I won’t want to leave!
The exterior of the house looks more cohesive and inviting. I decided to match the basement double-hung windows to the upper windows using none other than white first aid tape. Yes, if you approach the window closely, you can see they’re gridded with just tape, but from the street you can’t really tell the difference. My next project is to repaint the exterior of the house using more subtle, less stark colors than the traditional brown and gold.
I hope that you didn’t find these instructions too complex—or easy—and that you are empowered to take back your cottage view and make your home something unique.
Thanks for visiting,
Lois
 Compared to my other projects, my downstairs bathroom remodel really didn’t entail much work. I don’t even have before pictures for this blog entry. We had done a large part of the remodel a couple of years ago when we replaced the toilet and linoleum. This particular part of the project entailed replacing the old sink fixture and cabinet pulls, removing wallpaper, and painting.
 Although I had initially removed some thin mauve wallpaper years ago with a rented steamer, this time I was removing some thick grass paper I had installed 8 years ago. I rented a steamer again to remove it, and the sucker just wasn’t working for me this time. I looked online for possible solutions and found this:


 I found a cottage-style bead board cabinet at Lowe’s and worked the décor around that. Because I had salvaged the old tub and tile, I wanted a clean, white cottage look. Once I explained to my husband my ideas for the bead board wainscoting, he knew exactly what he had to buy, do, saw, and nail.


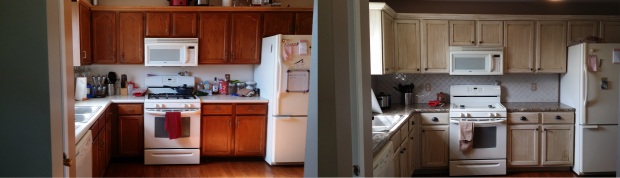 Before and after of my kitchen remodel…
 Each kit comes with an instructional DVD, green scrubbies, paint sticks, one container of deglosser, two cans of bond coat, two small cans of glaze, and cheesecloth for glazing. You get all of this with every kit. You cannot mix and match, nor can you buy these items separately from the kit. That’s just how Rustoleum packages this product.


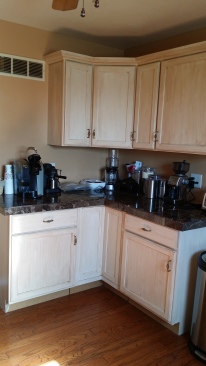 With only $3,000 in the budget, I felt I couldn’t afford to tear out and replace all the kitchen cabinets. About five years ago, we added some unfinished cabinets to the other side of the kitchen. They were in good condition, and I didn’t want to replace them. I know that mismatched cabinets are the trend these days, but I wanted all the cabinets to look like they belonged in the same kitchen, even though they were on opposite walls.
 Finally, there was the floor. Really, the floor was the only thing worth saving. It was true hardwood, installed when the house was built. It was dirty and worn and needed refinishing. If I hired a professional to refinish, I’m sure it would have cost me at least $500. Too much for my budget! So, I looked for information on how to DIY refinish my own floor and found a YouTube video, produced by This Old House.
 For the floor, there was a LOT of crawling around on my hands and knees, MUCH scrubbing, and profuse sweating. But the floor came out beautifully and sparkled as if it were new. Best of all, we were able to refrain from walking on the drying floor by just leaving the house for two days and going camping.
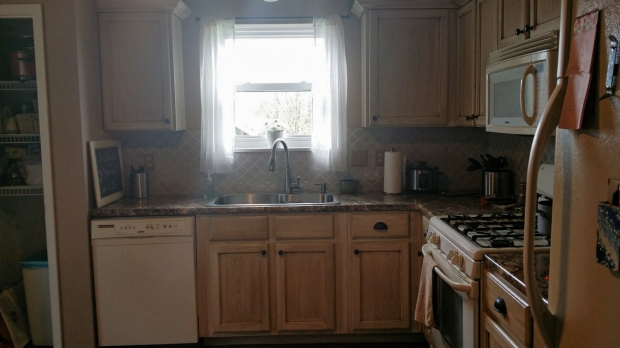
 Lastly, we had professionals through Home Depot replace the old bronze aluminum window with white vinyl. It really brightened the room, and now I can actually open the window! That I did not factor into the improvement budget, but it was well worth the cost, and now all the windows in the house match. The kitchen window has been adorned with modified shabby chic curtains…